
It’s extremely easy to set up automatic discounts within the iCheckout in WooCommerce. Let’s show you!
1. Buy X Get Y Discount
Add an automatic Buy X Get Y discount on checkout to increase the sales of a specific product.
How does it work?
Create an automatic discount that will be applied to the order price on checkout, and that could increase the sales of a chosen product in your shop. The discount could be added based on the minimum amount or quantity of a specific product reached in the cart.
Example 1: Add 2 pairs of shoes and one t-shirt to the cart, and get the t-shirt with a 30% discount on checkout.
Example 2: Add 3 pairs of t-shirts and one pair of sunglasses to the cart, and get the wristband for FREE.
Note: Both products need to be already added to the cart to make the discount work. The discounted product won’t appear by itself on the checkout page.
How can I set up this discount?
Structure of the discount setup:
- Discount title field – where you add the actual discount code, which will be visible to the customers
- Active dates field – the start/end date and time when the discount will be available to be used
- Discount type section – select if you want to create a “Buy X get Y”, “Percentage”, “Fixed amount” or a “Free Shipping” discount.
- “Discount applies when” section – choose the quantity/amount the customer needs to add to their cart and select the items
- “Customer will get” section – choose the discounted amount of the product that the customer will take advantage of
- Additional options section – set a maximum discount usage per order to restrict the discount

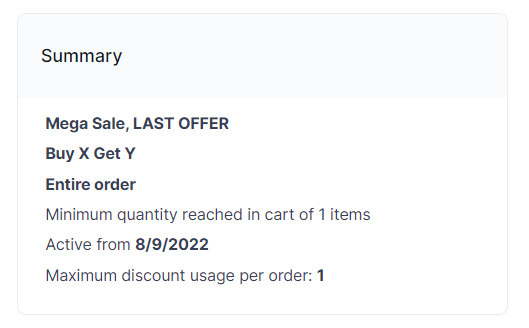
- Summary section – shows you how your discount will look like and work once created in iCheckout.
- Discount analytics – shows you how many people used the discount
Navigate to iCheckout, then follow these steps:
1. Go to “Discounts.”
2. Select “Create new” automatic discount.
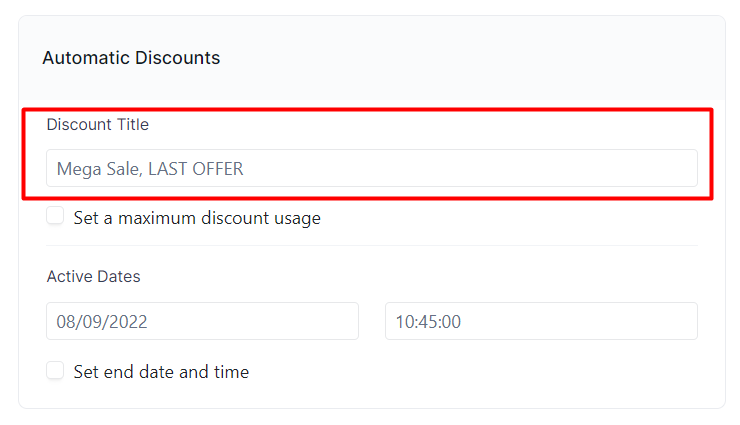
3. Add your Discount title. Keep in mind that the customers will see this title at your checkout.
Optional step: Set maximum discount usage. This way, there will be a limited number of people that will be able to use the discount. When the number of users reaches the limit, the discount will disable automatically.
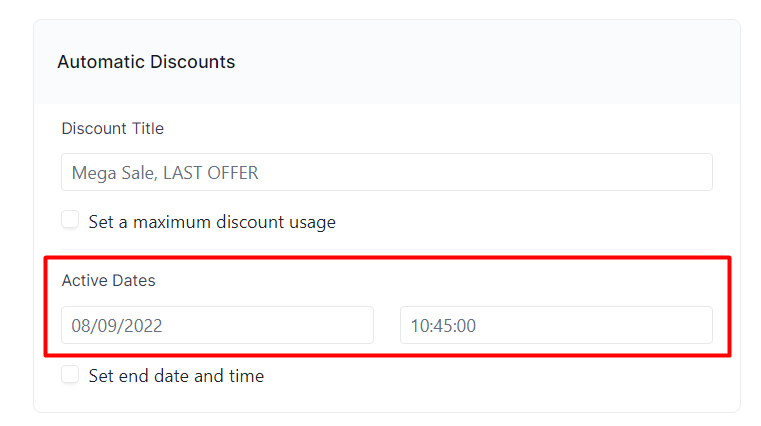
4. Add a starting/ending date and time
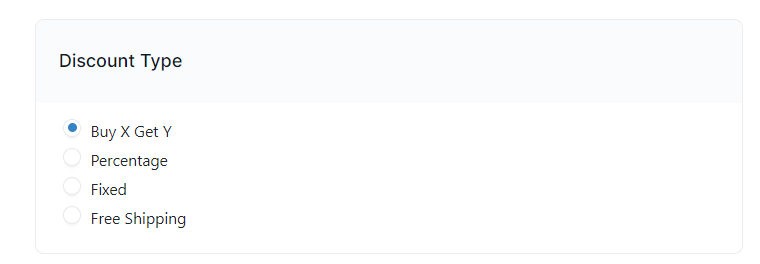
5. Choose the “Buy X get Y” discount type
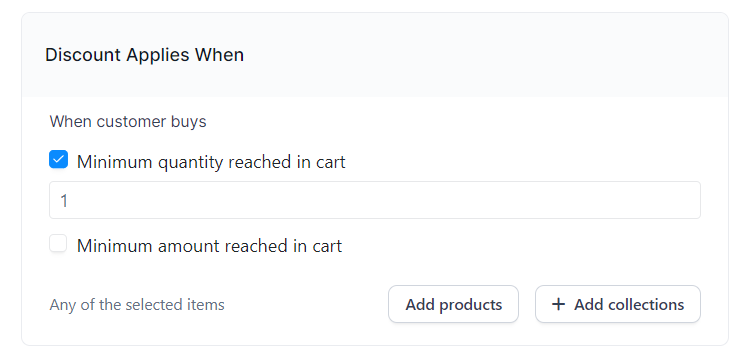
6. Choose the discount application criteria – the customer buys any of the following products (the X product), and you need to set up the minimum amount or quantity of these products reached on checkout. Here you can add only specific products or a whole collection.
- Minimum amount reached in cart – once a certain product amount reaches the cart, the discount will be applied automatically on the second product (the Y product) that is already added and the customer will get the discount on it
- Minimum quantity reached in cart – once a certain product quantity reaches the cart, the discount will be applied automatically on the second product (the Y product) that is already added and the customer will get the discount on it
- Choose the X product that the customer needs to buy – add the specific product or choose a whole collection that will be triggered. You can also edit the available item variants for the discount.
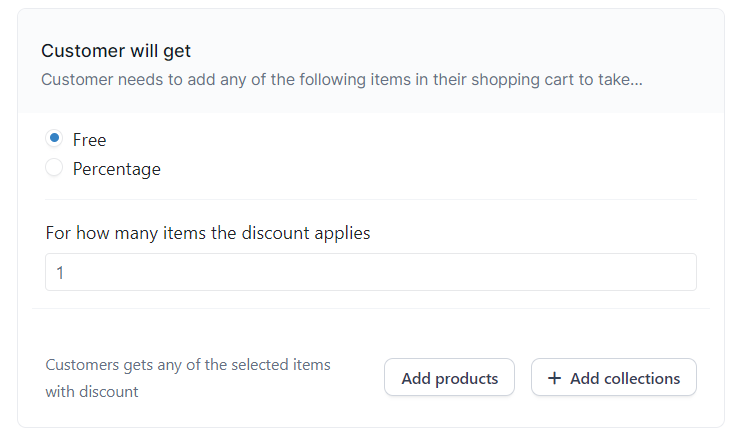
7. Choose what the customer will get – the customer will add any of the chosen items in their cart to take advantage of the discount. The customer will get the items at a discounted value based on the option you choose:
- Free – apply the discount automatically and get the item for free
- Percentage discount – add a percentage value and get the item with an automatic percentage discount (e.g., 20%). Then, choose how many items you want the discount to apply for. (e.g., the customer will get a discount on only 1 item).
Choose the Y product that the customer gets a discount for – add the specific product or choose a whole collection that will be triggered by the discount. You can also edit the available item variants for the discount.
Note: The discount will be applied only to the items you select in this section and only when they are already added to the cart.
Additional options: Set the maximum number of uses per order.
Example: If the customer buys 100 pairs of jeans, you won’t probably want them to get that many T-shirts with discounts. With this option, you can set a usage limit per order of the discount.
Summary section
This section summarizes the information about the setup of your discount. It contains the following fields:
- Discount type
- Discount amount
- Discount setup
- Active dates
- Performance
FAQ
How many Buy X get Y discounts can I create?
You can create as many as you want to!
If I have more than 1 automatic discount, which one will appear on the checkout?
If two automatic discounts are applicable, the one with the best value for the customer will be activated on the checkout page.
2. Fixed Amount Discount
Set up a fixed amount of the automatic discount applied to a specific product/collection or the entire order
How does it work?
Create an automatic discount that has a certain amount applied on checkout.
Example: Buy 7 t-shirts and get 50€ off of the entire order.
How can I set up this discount?
Structure of the discount setup:
- Discount title field – where you add the actual discount code, which will be visible to the customers
- Active dates field – the start/end date and time when the discount will be available to be used
- Discount type section – select if you want to create a “Buy X get Y,” “Percentage,” “Fixed amount,” or a “Free Shipping” discount.
- Discount setup section – add a discount value and choose the discount application criteria
- Discount applies on section – choose if you want to apply the discount on the entire order or specific products and collections.
- Summary section – shows you how your discount will look like and work once created in iCheckout.
- Discount analytics – shows you how many people used the discount.
Navigate to your iCheckout account, then follow these steps:
1. Go to Discounts.
2. Select “Create new” discount.
3. Add your Discount title. Keep in mind that the customers will see this title at your checkout.
Optional step: Set maximum discount usage. This way, there will be a limited number of people that could be able to use the discount. When the number of users reaches the limit, the discount will disable automatically.
4. Add a starting/ending date and time
5. Choose “Fixed amount” discount type
6. Set up the discount
Choose the discount value – add the fixed amount of the discount (e.g., 10 EUR)
7. Choose the discount application criteria
None – the discount will always be applied on checkout
- Minimum amount reached in cart – once a certain product amount reaches the cart, the discount will be applied automatically
- Minimum quantity reached in cart – once a certain product quantity reaches the cart, the discount will be applied automatically
8. Apply the discount on
Entire order – the discount will be applied to the total price of the entire order
Specific products and collections – select specific items for which the customer will get a discount. You could also choose the specific variants of the product that the discount will be applied to.
9. Choose how to apply the discount
- Apply discount on each item – apply the discount to each item in the order
- Apply discount once for all items – apply the discount to the whole order
Summary section
This section summarizes the information about the setup of your discount. It contains the following fields:
- Discount type
- Discount setup – here, you will see the discount value
- Discount applies on – entire orders or specific products and collections
- Active dates
- Performance
FAQ
How many fixed-amount discounts can I create?
You can create as many as you want to!
If I have more than 1 automatic discount, which one will appear on the checkout?
If two automatic discounts are applicable, the one with the best value for the customer will be activated on the checkout page.
3. Percentage Discount
Set up a discount with a percentage that will be automatically applied to a specific product/collection or the entire order.
How does it work?
Create an automatic discount that has a certain percentage applied on checkout.
Example: Buy 3 t-shirts and get 40% off of the entire order.
How can I set up this discount?
Structure of the discount setup:
- Discount title field – where you add the actual discount code, which will be visible to the customers
- Active dates field – the start/end date and time when the discount will be available to be used
- Discount type section – select if you want to create a “Buy X get Y,” “Percentage,” “Fixed amount,” or a “Free Shipping” discount.
- Discount setup section – add a discount value and choose the discount application criteria
- Discount applies on section – choose if you want to apply the discount on the entire order or specific products and collections.
- Summary section – shows you how your discount will look like and work once created in iCheckout.
Log in to your iCheckout account, then follow these steps:
1. Go to Discounts.
2. Select “Create new” discount.
3. Add your Discount title. Keep in mind that the customers will see this title at your checkout.
Optional step: Set maximum discount usage. This way, there will be a limited number of people that could be able to use the discount. When the number of users reaches the limit, the discount will disable automatically.
4. Add a starting/ending date and time
5. Choose “Percentage” discount type
6. Set up the discount
Choose the discount value – add the percentage amount of the discount (e.g., 40%)
7. Choose the discount application criteria
None – the discount will always be applied on checkout
- Minimum amount reached in cart – once a certain product amount reaches the cart, the discount will be applied automatically
- Minimum quantity reached in cart – once a certain product quantity reaches the cart, the discount will be applied automatically
8. Apply the discount on
- Entire order – the discount will be applied to the total price of the entire order
- Specific products and collections – select specific items that the customer will get a discount for. You could also choose the specific variants of the product that the discount will be applied to.
Summary section
This section summarizes the information about the setup of your discount. It contains the following fields:
- Discount type
- Discount setup – here,you will see the discount value
- Discount applies on – entire orders or specific products and collections
- Active dates
- Performance
FAQ
How many percentage amount discounts can I create?
You can create as many as you want to!
If I have more than 1 automatic discount, which one will appear on the checkout?
If two automatic discounts are applicable, the one with the best value for the customer will be activated on the checkout page.
Congrats! You’ve successfully created your discount strategy, adjusted your offers, and learned how to monitor your discount strategy performance.


